Showing posts with label jackets. Show all posts

Remix'd: Kimono Jacket

    | 40 comments
kimono jacket diy {who is that girl mo?}
Kimono jackets are another trend that I've been noticing AND I really like so I decided to make my own from a over sized button up shirt.

Remix'd: Denim Jacket

    | 30 comments
denim jacket diy {who is that girl mo?}
My son outgrew one of his denim jackets so of course I took it and made it more fun. I applied a printed sheet to the back panel and on the front of the pockets. I thrifted the sheet but you can use anything you want such as a graphic tee.

Remix'd: Military Vest, Finally!

    | 36 comments
military vest diy {who is that girl mo?}
I'm going to try to post 2 tutorials a week, time permitting of course. The second tutorial for this week is a military vest. I know I'm late to the game but I finally have one and as they say, better late than never. I found this cute military jacket a few weeks back at the thrift store and knew that it would make for the perfect vest. I love that it has a patterned panel in the back.

DIY: Bleached Denim Jacket

    | 34 comments
DIY bleached denim jacket pose 1 {who is that girl mo?}

This week's DIY project is a bleached denim jacket. The weather has been so nice lately that it feels like Spring so I decided to spruce up a denim jacket that I thrifted a few weeks ago. I love the fit but I wasn't too keen on the wash. It reminded me of old school mom jeans. :-) My initial idea was to bleach about half of the sleeves but then I decided that I wanted my jacket to have more of a grungy look. I created some holes to the sleeves to complete the look.

DIY: Sequin Trim Blazer

    | 31 comments
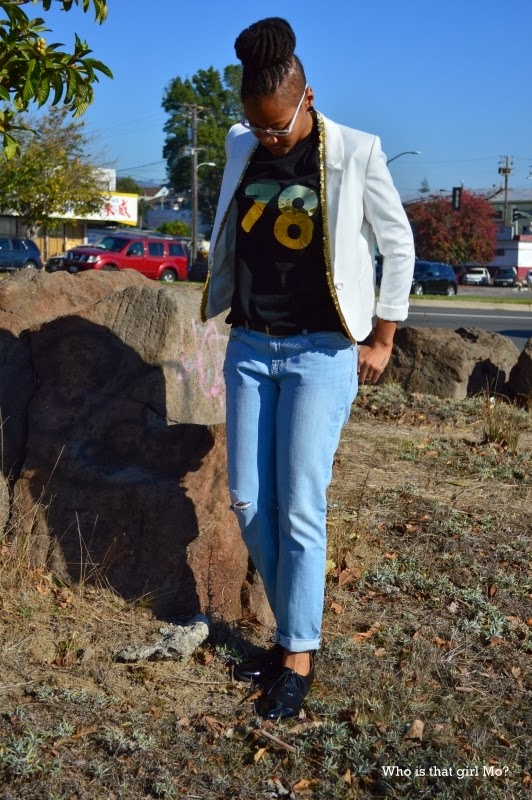
This month's DIY collaboration with Mckenzie from Why buy it DIY it is sequins. I chose sequins for December's project because sparkly and shiny pieces are usually worn for the fall/winter holiday season. I made a sequin trim blazer and this is an easy way for me to look festive without actually dressing up. I also made the gold foil number tee that I'm wearing. I'm so happy because I finally have a number tee in my birth year! 
Supplies:
blazer
about 2 yards of stretchy sequin trim depending on blazer measurements
fabric glue
pins
chalk/marking pen
fray stop
scissors
  • Measure around the lapels and collar of the blazer.
  • Mark the wrong side of the trim and blazer with the chalk and/or marking pen by adding dots to make sure that it will be evenly placed when glued. 
  • Pin the trim about 1/4 inch to the inside of the blazer lining up the dots.
  • Apply fabric glue to the blazer and press down onto the trim. I did this in sections
  • Let dry.
  • Cut off excess trim and apply fray stop to the ends.


What do you think about wearing sequins for the fall/winter holiday season? 
Make sure to check out Mckenzie's sequin sweatsuit!

Outfit Details:
jeans JBrand | tee Walmart | blazer H&M | oxfords Seychelles | bag Steve Madden


DIY: Varsity Blues

    | 40 comments

It's that time of the month again!! Mckenzie and I have teamed up to bring you guys another monthly DIY collaboration and this month's project is based on varsity sweaters. This one was super easy and fun. I styled my cardigan with a button up and oxfords to give it a somewhat preppy look.
Supplies:
cardigan
scissors
felt in 1 - 2 colors of your choice
ribbon in your choice of width
chalk or marking pen
fabric glue
printout of letter
  • With the cardigan on, measure around the upper area of your arm near the underarm area. mark where you want to place the ribbon with chalk.
  • Cut 2 or 3 strips of ribbon using this measurement and add about 1/2 inch.
  • Apply the fabric glue to the ribbon and glue onto the marked areas on the sleeve. Place something in between the sleeves such as a piece of cardboard of magazine. This is so the front and back sides of the sleeves won't stick together. Let dry.
  • Print out a letter of your choice using a large font. I used a font size of 400. Cut out the letter.
  • Place the letter onto the felt and trace around the edge with the chalk or marking pen. Cut out the felt letter.
  • Take the felt letter and place it on top of a new piece of felt. Trace around the edges about 1/2 inch. This will be the border. You can also print out the same letter in a bigger size and trace that as the border. Cut out.
  • Glue the letter onto the border with the fabric glue. Let dry.
  • Glue the letter and border onto the desired area of the cardigan. Let dry.
  • With the cardigan on, mark above and below your elbow with the chalk.
  • Using a round object such as a measuring cup, trace half circles at the top and bottom of the felt for your patches.
  • Connect the lines on the sides creating ovals. Cut out.
  • Apply glue to the elbow patch and press onto marked areas on the sleeves. Make sure something is placed in between.


Do you have any varsity sweaters or jackets in your closet? Will you be making one?
Don't forget to check out Mckenzie's DIY!

Outfit Details:
cardigan Target & DIY | button up Target | jeans Gap | oxfords Cole Haan


DIY: More Leather Pockets

    | 35 comments
The third project in my leather accent series is pockets again. Bigger pockets. I used my oversized cardigan and switched out the pockets. I think Fall is officially here in the Bay Area. The weather was overcast yesterday so I added a scarf to my look. I really only like the Fall season for the layering and styles you can wear. Other than that I. Don't. Like. To. Be. Cold. Seriously. One would think that the Bay Area weather should be a piece of cake compared to the East Coast, where I'm originally from, but cold is cold is cold. Yet, I'm excited that I can pull out the pieces I've been waiting to wear. I've yet to create my fall uniform but cardigans and boots may be my go to for the weekends.
Supplies:
cardigan
leather fabric
seam ripper
chalk
clips
sewing machine
  • Remove the original pockets from the cardigan with the seam ripper.
  • Use the original pocket and place on the leather fabric.
  • Trace with the chalk onto the leather.
  • Cut out the leather leaving room for seam allowance.
  • Fold down the seams about 1/4 inch and use the clips the hold in place.
  • Place the pockets onto same area as original pockets.
  • Topstitch the leather pockets onto the cardigan using a loose and longer stitch. 


Do you have your fall uniform ready? What piece/pieces will you be wearing repeatedly?


Outfit Details:
cardigan Forever21 & DIY | crop top Thrifted | leggings H&M | scarf Gifted from India | boots Nine West


DIY: Tartan Sleeved Blazer

    | 26 comments
Tartan and plaid are one of Fall's 2013 fashion trends. It was seen on the runways in shirts, pants, skirts, dresses and jackets. I've even spotted a few shoes in tartan here and there. Tartan and plaid was worn as uniforms for schoolgirls but it mostly seen in the 90s as the grunge movement. I guess grunge is back because we all know nothing is ever new. :-)
Source

In keeping up with this trend, I refashioned an old black blazer and replaced the sleeves with tartan. Here's how I did it.
Supplies:
tartan or plaid fabric (I used an old shirt)
blazer
sleeve pattern
chalk/marking pen
pins
seam ripper
sewing machine
Remove the sleeves from the blazer with a seam ripper.
Cut open the sleeves along the seam.
Lay the sleeves on the tartan fabric. This will be your pattern. 
You can use chalk/marking pen and trace around the sleeves or you can pin down the sleeves.
Cut out the new sleeves.
Fold the sleeve right sides facing each other and stitch a seam.
Turn the sleeves inside out and pin the shoulder area of the sleeve to the shoulder area of the blazer. Make sure the blazer is inside out.
Stitch a seam around the entire top area of the sleeve. I ended up creating 3 pleats at the top of the shoulder.
Fold the bottom of the sleeves about 1 1/2 inches twice and iron flat. Tack in place.
I styled my blazer in keeping with the grunge look by pairing it with some faded black skinny jeans and combat boots. 
Are you looking forward to wearing a piece in tartan or plaid this Fall? 


Fully In-vested

    | 15 comments


Back to life, back to reality. Happy Monday ya'll! This past weekend was relaxing. I didn't do too much but I did get dressed and I looked cute while doing it. I'm just kidding! I did some walking around town with Mel and enjoyed the warm weather. This blazer vest I made myself by removing the sleeves and sewing the edges. I tailored the blazer which was thrifted, to my shape so that it would be more fitting and kept my outfit funky by styling it with some destroyed cutoffs and a pair of floral Dr. Martens. Saturday evening we went bowling with some friends and had lots of fun. We were able to bowl about 3 extra games for free because the attendants weren't paying attention. Bowling usually becomes boring after 2 games but since we were sneaking in the extra games it made it more exciting and fun. How did you spend your weekend?


Outfit Details:
Blazer - Thrifted and DIY Similar
Shorts - DIY Similar
Boots - Dr. Martens 
Necklace - Forever 21 Similar


Always Do It Yourself

    | 21 comments


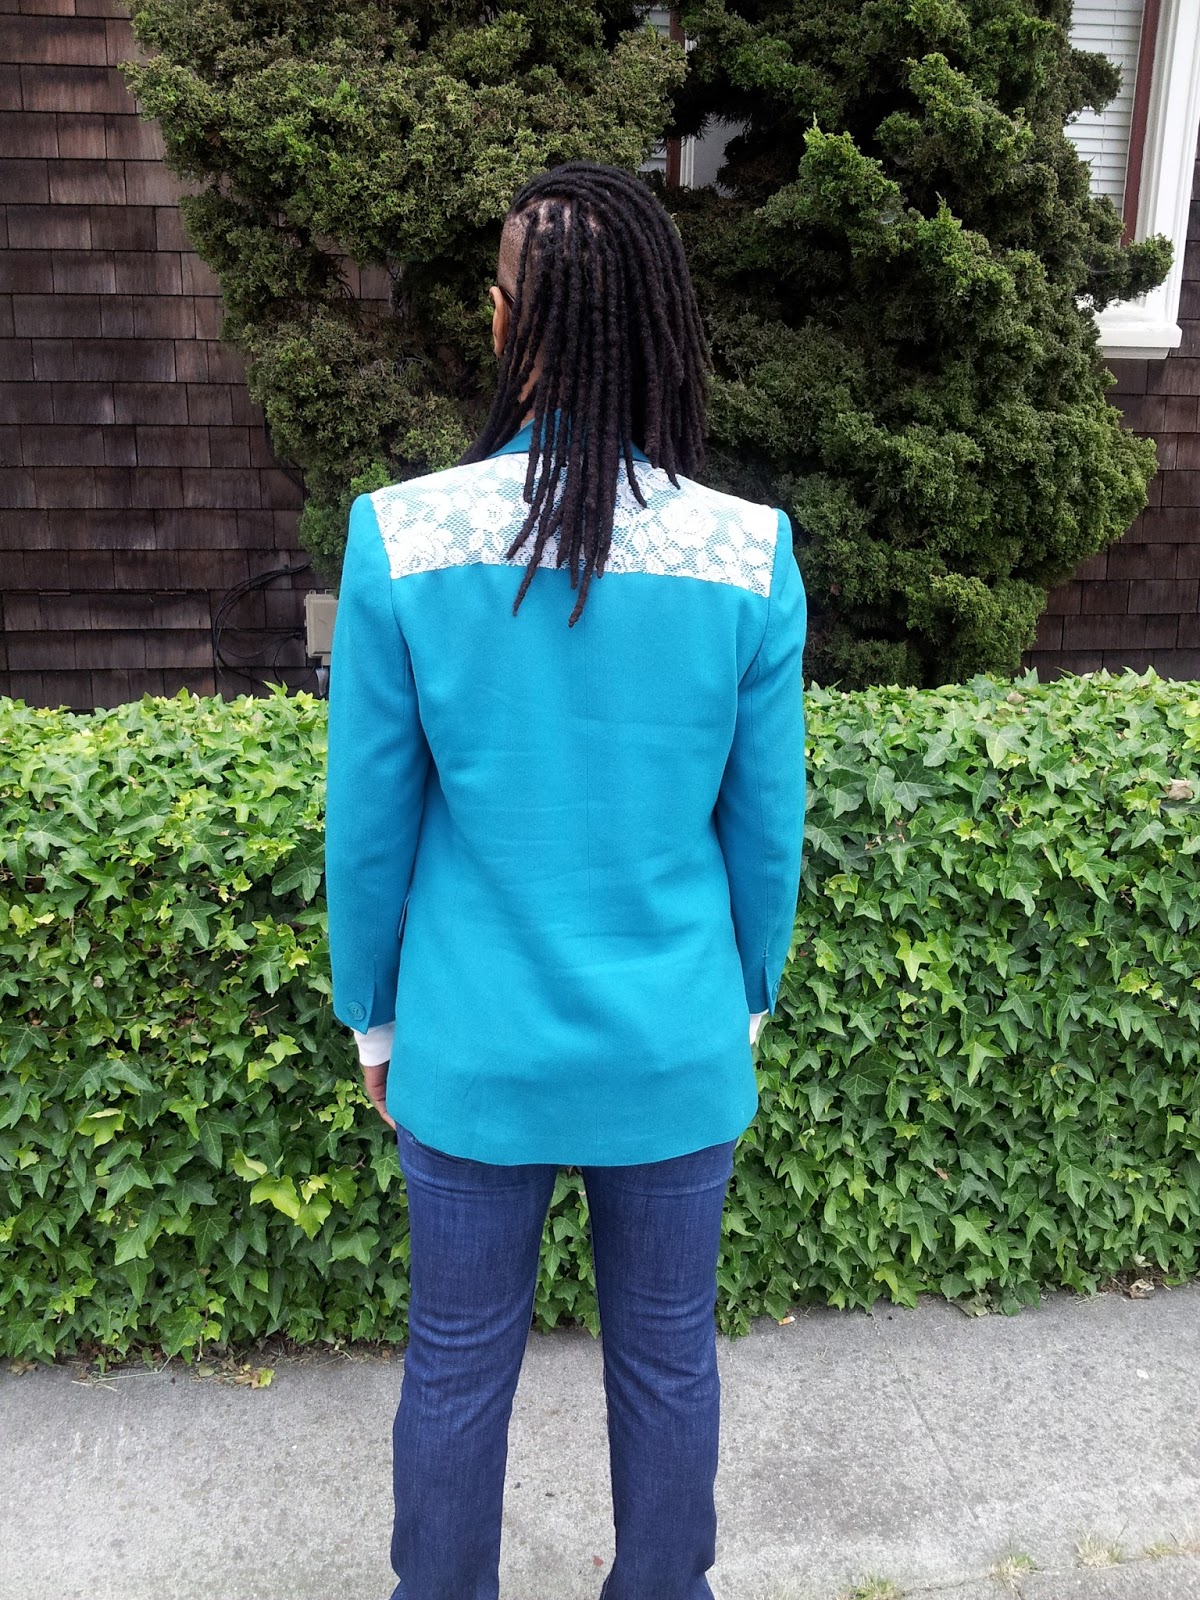
Sometimes it's easier and more convenient to buy pieces already made. Sometimes it's better when you add your own details and embellishments.Today I'm sharing with you guys a few DIYs that I've done this past weekend. The first is my turquoise blue blazer. I bought it when Goodwill had a 50% off sale. The blazer fit well but it had a small hole in the back. I really liked the color so I bought it knowing that I will come up with something to cover it up. What I came up with was lace. I used a lace curtain and cut it across the back of the blazer. I used fray stop to stop the ends from fraying and unraveling. I hand stitched the lace around the edges.


Next is another jacket I found at Goodwill. This jacket has many more holes but it gives it a worn in and edgy look. I added iron-on patches to the back of the jacket. I used gold stars and created a trail from top to bottom. I applied a music note patch on one of the sleeves. I also added stars to one of the front pockets as my armed forces insignia. I'm not sure what rank 3 stars are but I'm calling myself a captain. On the opposite pocket I made a patch with my last name. If you're not aware, I have a hyphenated last name and I used the second one. I got some alphabet stencils and used gold metallic paint. This was fun and easy.


Third is a army jacket that I was asked to help fix up last week. Keia was going on a trip to Miami and really wanted to bring the jacket. There were lots of rips all across the back and one huge hole at the bottom. At first, I wasn't sure if it could be repaired but I did some research and got some ideas. Mel also gave me a couple of suggestions. I glued black fabric on the inside of the jacket to cover up the holes. I then applied gold metallic paint around the edges of the holes to make it stand out. I also cut a few extra holes in round and crazy shapes to even it out a bit. I added a gold star patch to the outer edges of both front pockets and created 3 rows of gold studs across both shoulder areas. I thought I had more time than I did and because of that, took my time with the project. On Thursday after work around 6:30 pm, she texted me asking for the jacket and I wasn't done! She said it wasn't a big deal but I told her that I'd finish it for the evening. I really wanted to make sure she was able to take it with her on her trip. I wanted to add more to back of the jacket but  it was fine as it was. I think it turned out great. I gave it to her around 9:30 pm that night. Keia said she liked what I had done and that she received many compliments. Cool!

Before
After
For the last DIYs, I sewed my own patterned pockets onto solid color v-neck tees. I measured the original pocket on the shirt and cut the fabric pieces out based on the measurements. I machine stitched around the edges of the fabric. Lastly, I applied fabric glue to the pocket and pressed onto the shirt. This was done to 3 different shirts. I was going to add a pocket to my cream sweatshirt but changed my mind at the last minute and instead applied it to one of the pockets on a pair of cut-offs.


And that's it! What do you think about my DIYs?


Outfit Details:
Blazer - Thrifted Similar 
Sweatshirt - Old Navy Similar
True Religion Jeans - Nordstrom Rack Similar
Boots - Dillards Similar
Arrow Chain - Forever 21 Similar