Showing posts with label tops. Show all posts

Remix'd: Stripes and Florals

    | 38 comments
stripes + florals {who is that girl Mo?}
For this week's project I brought one of my favorite mixed prints together to create a graphic tee. This project was both fun and easy which usually are the best ones in my opinion.

Remix'd: Sexy Crop Top

    | 22 comments
sexy crop top {who is that girl Mo?}
I found this DIY tutorial from A Pair and  a Spare on Pinterest and knew I had to give it a try. I first tried it with a white tank but it wasn't long enough. I then thrifted this longer floral tank and it worked out a little better. The top was still a bit short so I had to get a little creative to make it work in the back. Even though it's a bit on the sexier/risque side of what I normally wear, I like how it turned out. This project is really easy and if you decide to make one of your own make sure you use a tank dress.

Remix'd: Cropped Sweatshirt

    | 31 comments
cropped sweatshirt {who is that girl Mo?}
I found this sweatshirt hiding in the furniture section of the thrift shop. The faux leather and studded details are what caught my eye. I cropped the sweatshirt and styled it over a bodycon dress and kept an all black look.

Remix'd: Crop Top + Printed Pockets

    | 26 comments
fabric pockets {who is that girl Mo?}
You can create anything from old clothing especially if it is over-sized. It can also be used as a cheaper alternative to buying fabric. I thrifted this maxi dress and out came a crop top and fabric covered pockets on a pair of cut offs . My first idea was to make a two piece short or skirt set but I needed a much larger sized dress. I still like how this turned out because it's still a 2 piece set. 

Remix'd: Shredded Back Tee

    | 29 comments
shredded back tee {whoisthatgirlmo?}
I bought this cool tie dye t-shirt from my latest thrift haul and I decided to make it into a muscle tee with cut outs in the back. This project was so easy and fun you should definitely make 1 or 2 or 3 of your own. It's perfect for the Summer months and you can even wear it over a swimsuit. 

Remix'd: Bow Back Tee

    | 21 comments
bow back tee {who is that girl mo?}
I made this t-shirt during one of my classes with the ladies back in April. Most of the ladies made shredded back tees and I plan on making one of my own soon. 
bow back tee {who is that girl mo?}

Remix'd: Contrasting Sleeves

    | 22 comments
contrast sleeves diy {who is that girl mo?}
I decided to add more oomph to a plain black tee by giving it contrasting sleeves. Since stripes are my favorite print, I used the sleeves from this striped top. If I know I'm not going to wear something more than once, I refashion a refashion. :-)

Remix'd: Tie Dye Shirt

    | 36 comments
tie dye tee diy {who is that girl mo?}
This week I'm styling a tie dye shirt I made using bleach. Quick and easy project to do on a warm afternoon.

Remix'd: Festival Inspired

    | 19 comments
Weekend 2 of the Coachella Festival is this upcoming weekend and sadly I will not be attending. Again. But that's alright, I can pretend. In spirit of festival style I created a fringe tee and scalloped edge denim shorts.

Remix'd: Exposed Zippers

    | No comments

exposed zipper diy {who is that girl mo?}
This week's refashion remix is exposed zippers. Exposed zippers are zippers that are clearly visible. It can be placed anywhere and it adds a little fun to something that may or may not be plain. I was so excited completing this super easy project that I added zippers to a tee, blouse, dress, crop top and a tank. I placed all of the zippers on the back.

Remix'd: Printed Off The Shoulder Sweatshirt

    | 15 comments
printed off the shoulder sweatshirt diy {who is that girl mo?}
The weather in the Bay Area has not been consistent and some days are really warm while others may be a little breezy. We've also had some rainy days but that didn't last too long either. With that said, I've decided to create an off the shoulder sweatshirt and made it a bit more fun by adding a printed piece to the front which I cut from an old pillowcase.

Remix'd: Mixed Print Shirt

    | 19 comments
remix mixed print shirt pose 1 {who is that girl mo?}
This week's remix is a mixed print shirt. Mixed prints is currently trending heavily with mixes such as florals and stripes, leopard and polka dots, or even paisley and plaid. The key to making this work is to make sure at least one color repeats in each pattern, mix small prints with bigger prints, and limit prints to two. For this project I took two printed shirts and made it into one color-blocked print top.

DIY: Lace Back Tunic

    | 19 comments
DIY lace back tunic pose 1 {who is that girl Mo?}
For this week's DIY project I decided to go through my stash and sew something from scratch. I haven't sewn anything from a pattern since I got my first sewing machine about 4 years ago. I feel like I'm horrible at pattern sewing and better at refashioning items. I always have trouble getting the sizing right but we all know that practice makes perfect and my goal is to sew something from scratch at least once a month. The first piece is a lace back tunic and I used a pattern fabric and black lace as the contrast for the top back. The fabric has been in my stash since I bought last summer when I attended the MimiGStyle conference. I used version C from the pattern. 
Supplies:
fabric 
pattern McCalls M6359
bias tape
pins
scissors
sewing machine
DIY lace back tunic tutorial pics {who is that girl Mo?}
DIY lace back tunic front and back view {who is that girl Mo?}
DIY lace back tunic pose 2 {who is that girl Mo?}

DIY lace back tunic pose 3 {who is that girl Mo?}

DIY lace back tunic pose 4 {who is that girl Mo?}

DIY lace back tunic pose 5 {who is that girl Mo?}

Outfit Details:
boots Crown Vintage | thrifted pants J Crew | hat H&M
Linking up with: THE STYLE RECORD | WHITNEY NIC JAMES | MONDAY MINGLE | Monday Bloom FUNDAY MONDAY | Mix It MondaysDO TELL TUESDAY

DIY: Graphic Tee

    | 47 comments
DIY graphic tee pose 1 {who is that girl mo?}
This week's DIY project is simple and fun. I decided to keep it easy so I can wear a casual look.
Supplies:
t-shirt
fabric paint
bowl
painter's tape
foam brush
cardboard or magazines
  • After coming up with a design, Apply the painter's tape to the shirt on the areas that you don't want painted.
  • Place the cardboard or magazine in between the shirt so the paint will not bleed through.
  • Pour paint into bowl.
  • Begin applying the paint in the desired areas.
  • Let dry overnight.
  • Carefully remove painter's tape from shirt.
DIY graphic tee tutorial pics {who is that girl mo?}
DIY graphic tee pose 2 {who is that girl mo?}

military jacket skinny jeans combat boots {who is that girl mo?}

DIY graphic tee pose 3 {who is that girl mo?}

DIY graphic tee pose 4 {who is that girl mo?}


Are you into graphic tees?

Outfit Details:
thrifted jeans BDG | boots MIA | jacket Old Navy

Linking up with: The Style Record |  Monday Mingle | Funday Monday
 Monday Bloom | Mix it Mondays | Do Tell Tuesdays | All Things Pretty

DIY: Shirtdress

    | 28 comments

I'm back with another DIY and this week I made a shirt dress from 2 men's button up shirts. By using two shirts I was able to make the dress color blocked. It's best to use shirts that are much larger than you. I used a large for the top half and an extra large for the bottom half. I ended up not having enough for the dress to wrap completely around me, so I used leftover scraps and created side panels. Next time I will use a 2xl button up.


I'm not really big on dresses but I like this style and it was cool to make. Are you big on dresses?


Linking up with: Whitney Nic James | The Style Record | Monday Bloom | Monday Mingle  
Funday Monday | Two Birds | A La Mode Monday | Do Tell Tuesday | Style Elixir
All Things Pretty

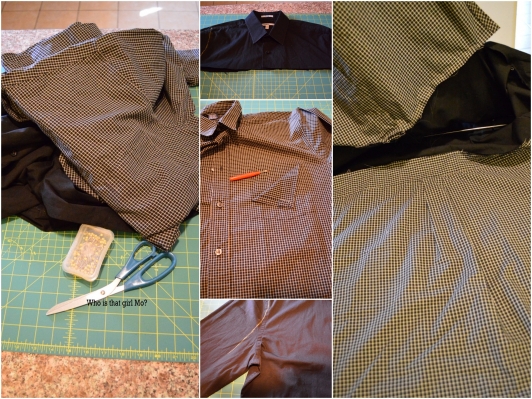
DIY: Color Blocked Shirts

    | 39 comments
This week I'm giving you not 1 but 3 different ways to make a colorblock top. The project can be done using 2 or more colors and you can totally choose where you want each color block piece to go and how big or wide you would like it to be. You can use old t-shirts or shirts that you have lying around the house or even new shirts that you just want to make some pretty changes to. It's best to use shirts of the same size and material to help make things go easier and smoother.
Supplies:
t-shirts/shirts
scissors
ruler
pins
chalk
sewing machine/serger
  • Mark on each shirt where you want each block to be place using the chalk and ruler and cut.
  • place each piece right sides facing each other making sure one piece is inside of the other piece. 
  • Pin around the edges to hold in place.
  • Sew using a straight stitch and then repeat using a zig zag stitch. You can also use a serger.
  • Iron the seams 

All black with a pop of neon
I made this shirt a little longer so it can be worn as a tunic with leggings. I used two t-shirts.


Diagonally cute
I made this shirt using two henleys. I thought I'd challenge myself but make sure you use shirts with nothing on it.
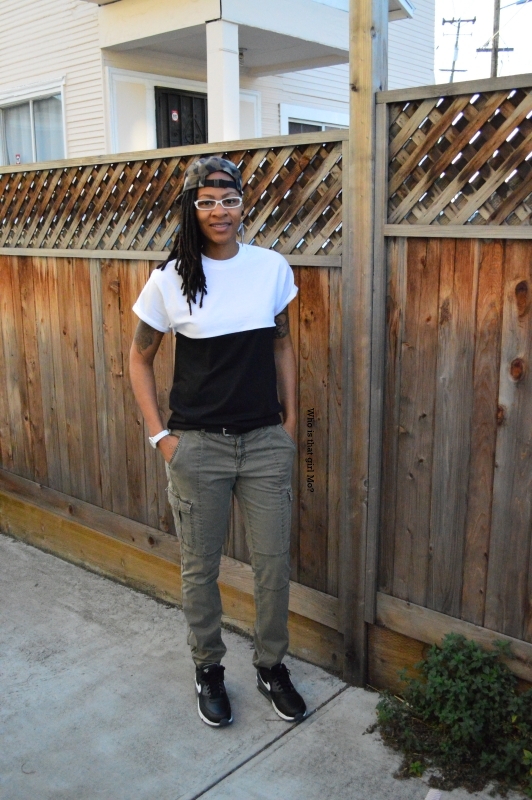


Tomboy Swag
For this shirt, I used black and white t-shirts. You can never go wrong with this classic color trend.


What do you guys think about this project? Which look is your favorite?

Happy MLK Jr. Day!!!


More Layers

    | 14 comments

Yay to Friday ya'll!! I decided to do another layered look but went more casual by ditching the sweater for a graphic t-shirt and wearing a good ole pair of chucks.


Have a great weekend ladies!!

Outfit Details:
men's button up Old Navy | t-shirt DIY | jeans American Eagle | sneakers Converse | bag Steve Madden 

Linking up with: Style Elixir | That Friday Blog Hop | Mamanista Fridays


DIY: Lace Insert Top

    | 34 comments

This week's DIY project is all about lace. I bought some black lace fabric about 2 months ago and I decided to put to use this past weekend. After searching online for some project ideas with lace, I came across this cool top which also included a DIY tutorial. It's pretty easy and requires absolutely no sewing which means you can try this at home.
Supplies:
shirt
lace fabric
chalk or marking pen
scissors
pins
heat bond
iron
shape template (optional)
  • Turn the shirt inside out. 
  • With the chalk mark the shape of your choice. You can also print out a shape and use that as a template.
  • Cut out the shape as marked on the shirt.
  • Pin down the piece that you cut onto the lace fabric.
  • Cut the lace around the shape with an extra 1/2 inch allowance.
  •  Remove the pins and place the right side of lace face down onto the wrong side of the shirt.
  • Follow the directions to apply the heat bond using the iron.
  • Cut off the excess fabric.


How do you feel about having lace added onto your clothing?

Outfit Details:
shirt Forever21 | jeans American Eagle | boots Franco Sarto | belt Calvin Klein | thrifted blazer Talbots

Linking up with: Monday Funday | The Style Record | Monday Mingle | Two Birds | BeBetsey | Style Elixir | All Things Pretty